


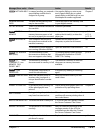

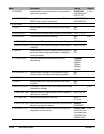
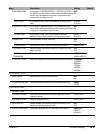

Chapter 13 Machine settings 13-3
Name
1.TEL REGISTRATION
1. 1-TOUCH SPD DIAL
2. CODED SPEED DIAL
3. GROUP DIAL
2. FAX SETTINGS
1. USER SETTINGS
1. DATE & TIME
2. DATE SETUP
3. UNIT TELEPHONE #
4. UNIT NAME
5.TX TERMINAL ID
1.TTI POSITION
2.TELEPHONE #
MARK
6. OFFHOOK ALARM
7.VOLUME CONTROL
1. CALLING VOLUME
2. LINE MONITOR
VOL
8. RX CALL LEVEL
9.TEL LINE TYPE
2. REPORT SETTINGS
1.TX REPORT
PRINT WITH IMAGE
Setting
—
—
—
—
—
—
—
MM/DD/YYYY
DD/MM YYYY
YYYY MM/DD
—
—
—
OUTSIDE IMAGE
INSIDE IMAGE
FAX
TEL
ON
OFF
—
1/2/3
0 (off)/1/2/3
HIGH
STANDARD
TOUCH TONE
ROTARY PULSE
—
PRINT ERROR ONLY
OUTPUT YES
OUTPUT NO
ON
OFF
Details
p. 7-2
p. 7-4
p. 7-6
p. 6-2
p. 6-2
p. 6-2
BG
p. 10-3
Description
—
Register one-touch speed dialing.
Register coded speed dialing.
Register group dialing.
—
—
Set the current date and time.
Select the date format displayed in the LCD and printed
on faxes you send.
Enter the fax/telephone number printed on faxes you
send.
Enter the name printed on faxes you send.
—
Select the position of the sender information (outside
or inside the image area) when sending black & white
faxes. (Automatically set inside the image area for color
faxes.)
Select the mark to appear before the fax/telephone
number printed on faxes you send.
Enable/disable the alarm that alerts you if the handset
is not hung up properly.
—
When the machine is set to ring, select the ring volume.
Select the dialing and on-hook volume.
Select the ring type for incoming calls.
Select the telephone line type setting for your machine.
—
Enable/disable automatic printing of a transmission
report after sending.
If you select <PRINT ERROR ONLY> or <OUTPUT YES>,
select whether the first page of the fax is printed under
the report (black & white faxes only).
Menu: USER DATA Function keys: [Copy], [Scan],[Photo Print], [Fax]
Fax Model
Fax Model
Fax Model