


3-9
Catalyst 2960 Switch Hardware Installation Guide
OL-7075-05
Chapter 3 Switch Installation (8-Port Switches)
Installing the Switch
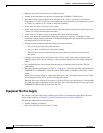
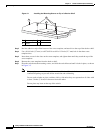
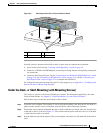
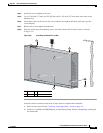
Figure 3-2 Mounting the Switch on Top of a Desk or Shelf
After the switch is mounted on the desk or shelf, do these tasks to complete the installation:
1. Power on the switch. See the “Verifying Switch Operation” section on page 3-6.
2. Connect to a 10/100 or 10/100/1000 port, and run Express Setup. See the switch getting started guide
for instructions.
3. Connect to the front-panel ports. See the “Connecting to the 10/100 and 10/100/1000 Ports” section
on page 2-18, the “Connecting to SFP Modules” section on page 2-19, and the “Connecting to a
Dual-Purpose Port” section on page 2-22 to complete the installation.
For configuration instructions about using the CLI setup program, go to Appendix C, “Configuring the
Switch with the CLI-Based Setup Program.”
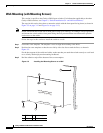
Under the Desk- or Shelf-Mounting (with Mounting Screws)
This section is specific to the Catalyst 2960 8-port switches. For information applicable to the other
Catalyst 2960 switches, see
Chapter 2, “Switch Installation (24- and 48-Port Switches).”
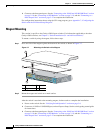
Follow these steps to install the switch under a desk or shelf:
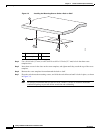
Step 1 Locate the screw template. The template is used to align the mounting screw holes and is also used as a
guide to make sure the screws are installed under the desk or shelf with proper clearance.
Step 2 Position the screw template underneath the desk or shelf so that the two side-by-side slots face the front
of the desk or shelf, as shown in
Figure 3-3. This ensures that the power cord faces the rear of the desk
or shelf after the switch is installed.
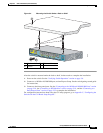
Step 3 Peel the adhesive strip off the bottom of the screw template, and attach it to the underside of the desk or
shelf.
1 Slides on this way 3 Desk or shelf
2 Screws
2x
3x
4x
5x
6x
7x
8x
1
Catalyst 2960
S
eries
CONSOLE
1x
S
P
D
D
P
L
X
S
T
A
T
S
Y
S
T
M
O
D
E
3
2
1
157816