


C-2
Catalyst 2960 Switch Hardware Installation Guide
OL-7075-05
Appendix C Configuring the Switch with the CLI-Based Setup Program
Connecting to the Console Port
After you have entered the configuration information for the switch, save it to flash memory by using
the write memory privileged EXEC command.
Note While in Express Setup mode, the IP address 10.0.0.1 remains active on the switch until you enter the
write memory command. You lose the Telnet connection after entering the write memory command.
For more information about using the CLI, refer to the command reference for this release.
Accessing the CLI Through the Console Port
You can access the CLI on a configured or unconfigured switch by connecting the console port of the
switch to the serial port on your PC or workstation and accessing the switch through a Telnet session.
To access the switch through the console port, follow these steps:
• Connecting to the Console Port, page C-2
• Starting the Terminal Emulation Software, page C-3
• Connecting to a Power Source, page C-4
• Entering the Initial Configuration Information, page C-4
See the “Verifying Package Contents” section on page 2-6 for a list of what ships with your switch.
Note You need to provide the Category 5 or higher straight-through cables to connect the switch ports to other
Ethernet devices.
Note The auto-MDIX feature is enabled by default. For configuration information for this feature, see the
switch software configuration guide or the switch command reference.
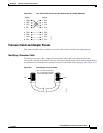
Connecting to the Console Port
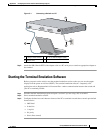
You can use the console port to perform the initial configuration. To connect the switch console port to
a PC, use the supplied RJ-45-to-DB-9 adapter cable.
Follow these steps to connect the PC or terminal to the switch:
Step 1 Using the supplied RJ-45-to-DB-9 adapter cable, insert the RJ-45 connector into the console port on the
rear of a switch, as shown in
Figure C-1.