


3-17
Catalyst 2960 Switch Hardware Installation Guide
OL-7075-05
Chapter 3 Switch Installation (8-Port Switches)
Installing the Switch
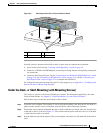
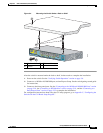
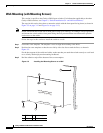
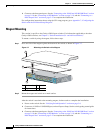
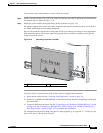
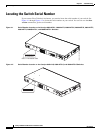
To mount the switch with brackets on a wall, follow these steps:
Step 1 Attach a 19-inch bracket to one side of the switch. Follow the same steps to attach the second bracket to
the opposite side, as shown in
Figure 3-10.
Step 2 Mount the switch with the front panel facing down, as shown in Figure 3-10.
For the best support of the switch and cables, make sure the switch is attached securely to wall studs or
to a firmly attached plywood mounting backboard.
Do not wall-mount the switch with its front panel facing up or sideways according to safety regulations.
Wall-mount the switch with its front panel facing down to prevent airflow restriction and to provide
easier access to the cables.
Figure 3-10 Mounting the Switch on a Wall
After the switch is mounted on the wall, do these tasks to complete the installation:
1. Power on the switch. See the “Verifying Switch Operation” section on page 3-6.
2. Connect to a 10/100 or 10/100/1000 port, and run Express Setup. See the switch getting started guide
for instructions.
3. Connect to the front-panel ports. See the “Connecting to the 10/100 and 10/100/1000 Ports” section
on page 2-18, the “Connecting to SFP Modules” section on page 2-19, and the “Connecting to a
Dual-Purpose Port” section on page 2-22 to complete the installation.
For configuration instructions about using the CLI setup program, go to Appendix C, “Configuring the
Switch with the CLI-Based Setup Program.”
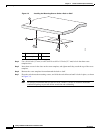
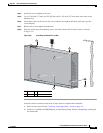
1 Phillips flat-head screw 2 User-supplied screws
200916
1 2