


Installing a Cisco 12008 3-3
Installing the Mounting Brackets
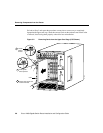
You must allow at least 24 inches (61 cm) of clearance in front of the router enclosure
for installing or replacing line cards, fan trays, and power supplies, and for attaching
network interface cables or equipment.
Caution You cannot use an AC-input power supply and a DC-input power supply in the
same router. All power supplies installed in a router must be of the same type. Do not
attempt to install an AC-input power supply in a router with a DC-input power supply, or
vice versa.
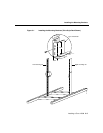
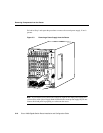
Installing the Mounting Brackets
Mounting brackets are shipped with every Cisco 12008 as part of an accessory kit. These
mounting brackets are designed for use with either a telco-style (2-post) or a 4-post
equipment rack. For simplicity, the procedure in this section describes the use of the
mounting brackets in conjunction with a telco-style rack.
Use of the mounting brackets is optional; you can install the Cisco 12008 in the rack
without using these brackets. However, due to the size and weight of the router, it is
recommended that these brackets not only be used, but also that two or more people install
the router to minimize the risk of personal injury or damage to the equipment.
Note The mounting brackets temporarily bear the weight of the router while it is being
positioned in the rack for permanent installation. These brackets can be left in place
following router installation.
To prepare for router installation, you can install the mounting brackets directly opposite
each other in the rack at any desired height. The height chosen should take into account the
following factors:
• The network cabling and equipment installation requirements
• Whether or not other equipment is (or will be) installed in the rack
• Whether or not more than one router will be installed in the rack