


Installing a Cisco 12008 3-9
Removing Components from the Router
Removing a Power Supply from the Router
The router is shipped with all the circuit boards and the AC-input or the DC-input power
supply(ies) already installed, as ordered, but without any cables connected.
To remove a power supply from the router, perform the following steps:
Step 1 Set the rotary power switch on each power supply, as follows:
• For an AC-input power supply—Set the switch to the Standby position.
• For a DC-input power supply—Set the switch to the OFF (O) position.
Note Turning the rotary power switch to the Standby position on the AC-input
power supply is equivalent to setting the same switch on the DC-input power
supply to the OFF position. In either case, turning the rotary power switch to the
full counterclockwise position releases a mechanical interlock (latching
mechanism), enabling you to remove the unit from the bay.
Step 2 Using a flat-blade screwdriver, turn the captive installation screw on the power
supply faceplate counterclockwise until it is freed from the sheet metal flange of
the power supply bay.
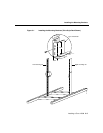
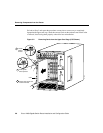
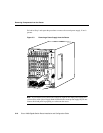
Step 3 Grasp the power supply carrying handle with one hand and pull the unit halfway
out of the bay (see Figure 3-3).
Caution Use both hands in removing a power supply.
Step 4 Place your free hand beneath the power supply to support its weight and slide
the unit completely out of the bay.
Step 5 Set the power supply aside temporarily until you are ready to reinstall it
following completion of the rack-mounting procedure described in the following
section entitled “Rack-Mounting the Cisco 12008.”