


Adding, Removing, or Replacing an AC-Input Power Supply
Cisco 12008 Gigabit Switch Router Installation and Configuration Guide
7-8
Note It is recommended that you connect each AC-input power supply to an independent
source of power with a 20A service. It is also recommended that you use an uninterruptable
power source (UPS) for your site to protect against a site power failure.
To add a second (redundant) AC-input power supply to the router, perform the following
steps:
Step 1 Locate the source AC circuit breaker that will service the AC-input power
supply; ensure that this circuit breaker is set to the OFF position.
For added safety, tape the circuit breaker handle in the OFF position.
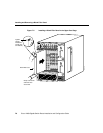
Step 2 Using a 1/4-inch flat-blade screwdriver, loosen the captive installation screw on
the blank filler panel covering the vacant (upper) power supply bay; remove the
filler panel and retain it for possible future use.
Presumably, you will install the new power supply in the upper power supply
bay, since, by convention, a single AC-input power supply is installed in the
lower bay.
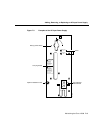
Step 3 Ensure that the rotary power switch on the faceplate of the new power supply
that you intend to install is set to the standby (OFF) position (see Figure 7-3).
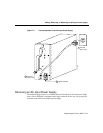
Step 4 Grasp the carrying handle on the new power supply with one hand; while lifting
the power supply, place your free hand beneath the unit to support its weight.
Warning The AC-input power supply weighs 17 lb (7.73 kg). For safety, use both hands
to install the unit in the power supply bay.
Step 5 Position the power supply appropriately for insertion into the vacant upper bay.
Step 6 Gently slide the unit into the bay, carefully seating it so that the power supply
faceplate rests flush against the sheet metal of the power supply bay.