


Maintaining the Cisco 12008 7-37
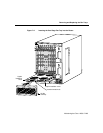
Adding, Removing, or Replacing a DC-Input Power Supply
Verifying the Installation of a DC-Input Power Supply
To verify the operation of a newly-installed DC-input power supply, first apply power to the
unit and observe the status of the LEDs on the power supply faceplate.
To verify the operation of a newly-installed DC-input power supply, perform the following
steps:
Step 1 First, verify that the following conditions are satisfied:
• The power supply is completely inserted into the bay and secured in place
with the captive installation screw.
• A vacant power supply bay is covered with a blank filler panel.
• The source DC power cables are connected properly to the terminals on the
power supply faceplate.
• The source end of the DC power cable is properly connected to the main
source DC circuit breaker.
• The main source DC circuit breaker servicing the DC-input power supply is
in the ON (|) position.
• The source DC voltage is within the range indicated on the power supply
faceplate.
• If two DC-input power supplies are installed, each power supply is being
serviced by a separate 40A DC power source.
Step 2 Assuming that you have not already done so, set the rotary power switch of the
newly installed power supply to the ON position.
Step 3 Observe the behavior of the green INPUT OK LED on the power supply
faceplate for the following conditions:
• If the source DC voltage is within the proper range, the INPUT OK LED goes
on.
• If the green INPUT OK LED does not go on, determine if
(a) The main source DC circuit breaker is on.
(b) The source DC power cables are connected properly to the terminals on
the power supply faceplate.