


11-13
Cisco ME 3400 Ethernet Access Switch Software Configuration Guide
78-17058-01
Chapter 11 Configuring VLANs
Creating and Modifying VLANs
Configuring UNI VLANs
By default, every VLAN created on the switch is a UNI isolated VLAN. You can change the
configuration to UNI community VLAN or to a private VLAN or RSPAN VLAN. For procedures for
configuring private VLANs or RSPAN VLANs, see Chapter 12, “Configuring Private VLANs” and
Chapter 24, “Configuring SPAN and RSPAN.”
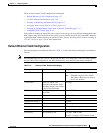
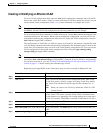
Beginning in privileged EXEC mode, follow these steps to change the type of a UNI VLAN:
Use the no uni-vlan VLAN configuration command to return to the default (UNI isolated VLAN).
Entering uni-vlan isolated command has the same effect as entering the no uni-vlan VLAN
configuration command. The show vlan and show vlan vlan-id privileged EXEC commands also display
UNI VLAN information, but only UNI community VLANs appear. To display both isolated and
community VLANs, use the show vlan uni-vlan type command.
Command Purpose
Step 1
configure terminal Enter global configuration mode.
Step 2
vlan vlan-id Enter a VLAN ID, and enter VLAN configuration mode. Enter a new VLAN
ID to create a VLAN, or enter an existing VLAN ID to modify that VLAN.
By default, the VLAN is a UNI isolated VLAN.
Note The available VLAN ID range for this command is 1 to 4094.
Step 3
uni-vlan {community | isolated} Configure the UNI VLAN type.
• Enter community to change from the default to a UNI community
VLAN.
• Enter isolated to return to the default UNI isolated VLAN.
Note VLAN 1 is always a UNI isolated VLAN; you cannot configure
VLAN 1 as a UNI community VLAN. The reserved VLANs 1002 to
1005 are not Ethernet VLANs.
Step 4
end Return to privileged EXEC mode.
Step 5
show vlan uni-vlan [type] Display UNI VLAN information. Enter type (optional) to see only the
VLAN ID and type of UNI VLAN.
Step 6
copy running-config startup config (Optional) Save the configuration in the switch startup configuration file.