


102 Installing Upgrades
www.dell.com | support.dell.com
NOTE: If your Dell microprocessor upgrade kit includes a replacement
voltage regulator module (VRM), follow the instructions in the documentation
that came with the upgrade kit.
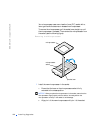
CAUTION: The processor can get very hot during system
operation. Be sure that the processor has had sufficient time to
cool before you touch it.
CAUTION: Before you perform this procedure, see "Safety First—
For You and Your Computer."
1
Turn off the computer and peripherals, disconnect them from their
electrical outlets, wait at least 5 seconds, and then remove the
computer cover.
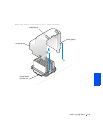
2 Rotate the power supply away from the system board.
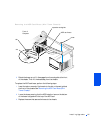
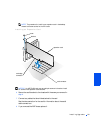
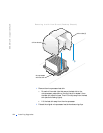
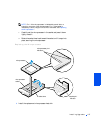
3 Remove the airflow shroud.
• If your computer is a mini tower chassis, pull back the release tabs
on the top of the shroud and lift the shroud up until the anchor
tabs disengage from the chassis frame. See "Removing the Airflow
Shroud (Mini Tower Chassis)." Then lift the airflow shroud out of
the chassis.
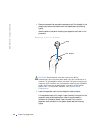
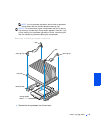
• If your computer is a desktop chassis, lift the shroud up until the
anchor tabs disengage from the chassis frame. See "Removing the
Airflow Shroud (Desktop Chassis)." Then lift the airflow shroud
out of the chassis.