


2. Keep the Phillips #2 screwdriver ready.
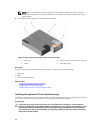
3. Remove the hard drive cage. For more information, see Removing the optional 2.5 inch hard drive
cage.
4. Remove the hard drive cage cover. For more information, see Removing the optional 2.5 inch hard
drive cage cover.
NOTE: If you are installing four hard drives, ensure that you install hard drives 3/D and 2/C before
you install hard drives 1/F and 0/E.
NOTE: If you are installing two hard drives, install hard drives 1/F and 0/E.
NOTE: To maintain proper system cooling, a minimum of 2 hard drives must be installed in hard
drive slots 0/E and 1/F.
Steps
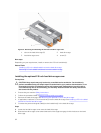
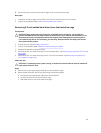
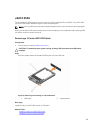
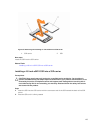
1. To install hard drives 3/D and 2/C, perform the following steps:
a. Slide hard drive 3/D into the hard drive cage.
b. Lower hard drive 2/C into the hard drive cage.
c. Secure the hard drives to the hard drive cage by using the screws.
d. Connect the power/signal cable to the hard drives.
e. Route the cables through the cable routing clip on the hard drive cage.
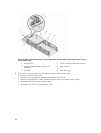
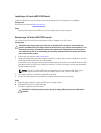
2. To install hard drives 1/F and 0/E, perform the following steps:
a. Slide hard drive 1/F into the hard drive cage.
b. Lower hard drive 0/E into the hard drive cage.
c. Secure the hard drives to the hard drive cage by using the screws.
d. Connect the power/signal cable to the hard drives.
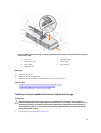
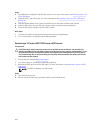
Next steps
1. Install the 2.5 inch hard drive cage cover.
2. Install the hard drive cage into the hard drive cage slot.
3. Connect the power/signal cables to the system board.
4. Follow the procedure listed in After working inside your system.
5. Enter System Setup and ensure that the hard drive's controller is enabled.
6. Exit the System Setup program and reboot the system.
7. Install any software required for the hard drive operation as described in the documentation for the
hard drive.
Related Tasks
Installing the optional 2.5 inch hard drive cage cover
Installing the optional 2.5 inch hard drive cage
96