


2. Keep the 5 mm and 6 mm Hex nut drivers, #2 Phillips screwdriver, and #2 Phillips round screwdriver
ready.
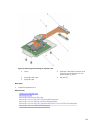
3. Remove the system board.
CAUTION: Do not lift the system board by holding a memory module, processor, or other
components.
CAUTION: Take care not to damage the system identification button while placing the system
board into the chassis.
NOTE: You must remove the system board to replace a faulty system board.
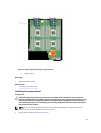
Steps
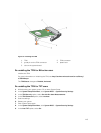
1. Hold the system board by its edges and orient it toward the front of the chassis.
2. Align the USB connectors with the slots on the front wall of the chassis.
3. Lower the system board and install the screws to secure the system board to the chassis.
Next steps
1. Install the following:
a. internal USB key
b. SD vFlash card
c. IDSDM/rSPI card
d. NDC
e. PCIe mezzanine cards
f. expander card
g. storage controller card
h. hard drive/SSD cage
i. hard drive/SSD backplane
j. hard drive(s)/SSD(s)
NOTE: Ensure that you reinstall the hard drives/SSDs in their original locations.
k. cooling shroud
l. memory modules
m. processor(s) and heat sink(s)
2. Remove the plastic I/O connector covers from the back of the system.
3. Follow the procedure listed in After working inside your system.
4. Import your new or existing iDRAC Enterprise license. For more information, see the iDRAC8 User's
Guide at dell.com/esmmanuals.
5. Ensure that you:
a. Use the Easy Restore feature to restore the Service Tag. For more information, see Restoring
the Service Tag using Easy Restore.
b. If the Service Tag is not backed up in the backup flash device, enter the system Service Tag
manually. For more information, see Entering the system Service Tag using System Setup.
c. Update the BIOS and iDRAC versions.
112