


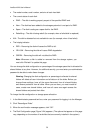

freeStor 4020 User’s Manual
56
storage system. For more information, refer to “Accessing the storage system using FTP”.
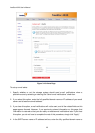
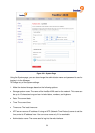
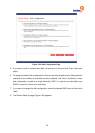
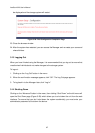
To change any of the network settings:
1. Make the desired changes based on the following options:
• Workgroup name: The workgroup to which the storage system belongs on the network. In
the Workgroup name text box, enter the name of the workgroup. This name can be up to
15 characters long.
• Get an IP address automatically: Instructs the freeStor 4020 to obtain an IP address
from a DHCP server on the network.
• Use this IP address: Sets the IP address of the freeStor 4020 manually based on the
fields below.
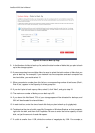
• IP address: The IP address of the device (if set to manual IP mode).
• Subnet mask: The subnet mask of the device (if set to manual IP mode).
• Gateway IP address: The gateway IP address of the device (if set to manual IP mode).
• Preferred DNS server: The primary DNS server’s IP address for the device to use (if set
to manual IP mode).
• Alternate DNS server: The secondary DNS server’s IP address for the device to use (if
set to manual IP mode).
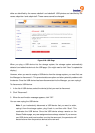
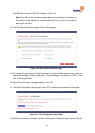
• Enable DHCP server: Enables the DHCP server on the freeStor 4020. It is important to
note that only one DHCP server should be active on the network at any one time to prevent
conflicts.
• Starting IP address: The start of the IP address range to be assigned by the DHCP
server.
• Ending IP address: The end of the IP address range to be assigned by the DHCP server.
2. Click “Apply”.
3. When the confirmation message appears, click “OK”.
Note: If you changed the IP address of the storage system, you must now
access the Manager using the new IP address.