


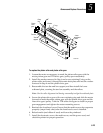

Remove and Replace Procedures
5-19
5
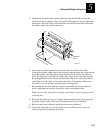
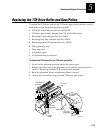
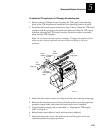
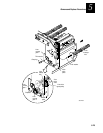
5. Pull out on the TTR takeup hub to release the clutch/pulley assembly.
Retain the thin washer located between the TTR takeup hub and main deck
plate.
6. Remove the TTR takeup clutch/pulley assembly and TTR drive belt.
Note: Do not remove the motor plate or subplates. Changing the position of these
plates can alter factory alignment and cause ribbon wrinkling or self-strip
problems.
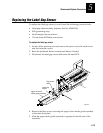
7. Replace the TTR takeup hub, the TTR takeup clutch/pulley assembly, the
TTR drive belt, or any combination of them now.
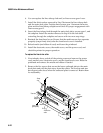
To replace the TTR takeup hub, TTR takeup clutch/pulley, and TTR drive belt
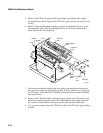
1. Wrap the TTR drive belt around the TTR takeup clutch/pulley, positioning
the assembly so that the TTR takeup hub shaft can be inserted into the
clutch/pulley.
2. Install the TTR takeup hub with the thin washer removed in Step 5 above.
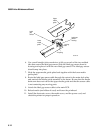
3. Install the thick washer removed in Step 4 and the two new retaining snap
rings to secure the TTR takeup components in place.
4. Loop the loose end of the TTR drive belt around the TTR drive gear\pulley.
5. Reattach the front bezel cover. Ensure that the media access door operates
properly (snaps firmly shut) after the front bezel cover is installed.
6. Reload media (and ribbon if used) and lower the printhead.
7. Install the electronics cover and the media cover.
8. Install the power cord and check the printer for proper operation.