3600 Printer Maintenance Manual
5-10
3. Unplug the Kanji/Katakana PCB from the main PCB using a gentle rocking
motion while pulling it away.
4. Install the new Kanji/Katakana PCB onto the main PCB, making sure the
pins are properly aligned with the connector and that the Kanji/Katakana
PCB is fully seated before tightening the screws.
5. Install the electronics cover, the media cover, and the power cord, and
check the printer for proper operation.
Replacing the Label Mark Sensor
To replace the label mark sensor, you will need the following parts and tools:
• Label mark sensor cable assembly, Intermec Part No. 061578-001
• Roller alignment tool, Intermec Part No. T43150
• ESD grounding strap
• #1 and #2 Phillips screwdriver
To replace the label mark sensor
1. Switch off the printer power and remove the power cord.
2. Remove the media cover, the electronics cover, and the front bezel cover
(refer to “Replacing the Bezel PCB” earlier in this chapter).
3. Raise the printhead. Remove media and ribbon if loaded.
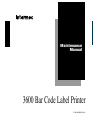
4. Remove the screws securing the lower outboard plate to the printer and
pull it away from the printer. Retain the tear bar and tear bar support.
3600M.048
Lower outboard
plate
Tear bar
Tear bar
support