


4-12 Manual Calibrations
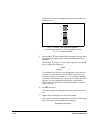
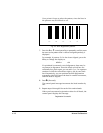
Use a printer’s loupe to select the pattern, since the lines in
the patterns may be difficult to see.
7. Press the , or ) control panel keys repeatedly until the num-
ber next to the pattern that is closest to aligned perfectly is
displayed.
For example, if pattern +2.0 is the closest aligned, press the
, key to change the display to:
HEAD-1 +2.0
If a printhead is extremely out of alignment, there may be
no pattern in alignment. Since the black vertical bars are
nominally five pixels apart, you can add +5 or -5 to a pattern
number to shift the colored bars right or left by one black
bar. Alternatively, you can perform the BiDi Registration
repeatedly, which will move the head in smaller increments,
until the head is aligned.
8. Press ! (Proceed).
The control panel message increments the head number by
one.
9. Repeat steps 6 through 8 for each of the twelve heads.
When you have entered registration values for all heads, the
control panel displays this message:
Registration Successful
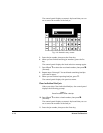
Fig. 4-2. BiDi Registration pattern.
+2 0 -2+4+6