


Chapter 3. Upgrading the Enterprise Virtual Array to v3.020
Note
The default appliance name for a Storage Managem ent Appliance (hardware version 1.0)
begins with
swma
and includes the last 6 characters of the appliance serial number.
If the Storage Management Appliance software was restored using the Quick Restore CD v2.0,
thenthedefaultappliancenamebeginswith
sma
and includes all 12 characters (10 characters
for Storage Management Appliance III) of the appliance serial number.
The default a
ppliance name for a Storage Mana gement Appliance II begins with
sma
and
includes all
12 characters (10 characters for Storage Management Appliance III) of the
appliance serial number.
The serial number is displayed on a sticker which is usually pasted to the lower right side of
theappliance(whenviewedfromthefront).
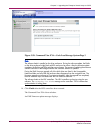
8.
In the Enter Network Password page, type your User Name and Password,and
click OK.
The Storage Management Appliancesoftwarehomepagedisplays.
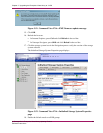
9.
Click Settings.
10.
Click Maintenance.
11.
Click Install Software.
The Installation Wizar
d welcome page displays.
Note
SMI-S EVA does not support reinstallation. Uninstall the previous versions of SMI-S EVA before
installing SMI-S EVA v3.2. To uninstall SMI-S EVA see Uninstalling SMI-S EVA.
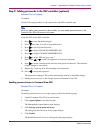
12.
Click Next.
13.
From the Installation Wizard, select Local Disk on the Storage Management Appliance.
14.
Click Next.
15. From the drop-down list, choose the hpSMISEVA_3_2.swp.
16.
Click Next.
17. From the drop-down list, choose hp SMI-S EVA.
18.
Click Next to start the installation.
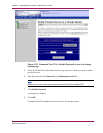
The following message displays:
Installation is in progress.
The time taken to complete the installation depends on the size of the application and
the speed of the network connection. After the installation completes, the following
message displays:
Installation is complete
Installing hp StorageWorks SMI-S for EVA <Date> <Time>
Install Complete
88
hp Stor ageWorks Enterprise Virtual Array Updating Product
Software Instructions