


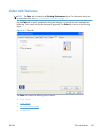


7. Type the name and path of the font metric file in the Printer Font File Location text box, or
click Browse to locate the file on the computer. The font file names appear in the Font(s) to be
Added window.
8. Select the fonts that you want to add, and then click Add. The fonts are installed and the file
names appear in the Installed Font(s) window.
9. Click OK to close the HP Font Installer dialog box.
Removing external fonts
1. In Windows Vista and Windows 7, click the Start button, click Control Panel, click
Hardware and Sound, and then click Printers.
In Windows XP, Windows Server 2003, and Windows Server 2008, click Start, click Settings,
and then click Printers and Faxes.
2. Right-click the name of the product.
3. Click Properties.
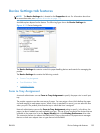
4. Click the Device Settings tab.
5. Click the External Fonts option. The Properties button appears.
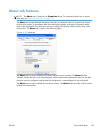
6. Click Properties. The HP Font Installer dialog box appears. The external fonts that are
installed appear in the Installed Fonts window.
7. Select the fonts that you want to remove, and then click Remove. The fonts are removed.
8. Click OK to close the HP Font Installer dialog box.
Installable Options
Items under Installable Options are automatically populated and their default settings are set when
the driver is installed.
The product has printing options that you can install and configure in this section. The following controls
are available:
●
Allow Manual Duplexing
●
Job Separator
●
Printer Status Notifications
Allow Manual Duplexing
Select the Allow Manual Duplexing item to print on both sides of any supported size and most
types of paper (except transparencies, envelopes, and labels). To use this feature, you must reinsert the
paper stack into the input tray to print the second side. The product pauses while you make this
adjustment.
This setting is enabled by default.
ENWW
Device Settings tab features
157