


72 Hardware Maintenance Manual: xSeries 220
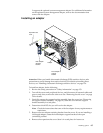
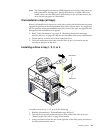
6. Install rails on each drive in the drive cage:
a. Pull the blue slide rails out of the plastic bag.
b. Install the screws on the sides of the drive.
c. Align the rails on the drive with the guide rails in the drive bay.
d. Push the drive into the bay until it clicks into place.
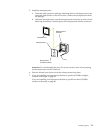
7. Reinstall the drive cage in the server. Rotate the drive cage downward until it
snaps into place.
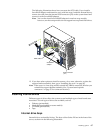
8. Connect the server SCSI and power cables to the rear of the drives.
Note: Ensure that you route the SCSI cable so that it does not block the airflow to
the rear of the drives or over the microprocessors.
9. If you have other options to install or remove, do so now; otherwise, replace the
support bracket assembly; then go to “Installing the cover” on page 83.
Note: If the server is a hot-swap model, reinstall the VRM in connector J42 after
you reinstall the support bracket assembly. (See “System board options
connectors” on page 55 for connector location.)
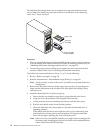
Installing a hot-swap hard disk drive in bay 5, 6, or 7
If the server is a hot-swap model, it contains hardware that you can use to replace a
failed hard disk drive without turning off the server. Therefore, you have the
advantage of continuing to operate the system while a hard disk drive is removed or
installed. These drives are known as hot-swap drives. If these drives are connected to
an optional controller, such as a ServeRAID controller, that supports this function, and
if one of these drives becomes defective, the ServeRAID controller can rebuild the
data from that drive onto another hot-swap drive. Refer to the information that comes
with the ServeRAID controller for details.
Each hot-swap drive has two indicator lights: the hard disk drive activity light and
the hard disk drive status light. When the green hard disk drive activity light is
flashing, the controller is accessing the hard disk drive. When this occurs, the SCSI
activity light on the front of the server also illuminates. The SCSI activity light is
illustrated and described in “Server controls and indicators” on page 6. If the amber
hard disk drive status light for a drive is lit continuously, that individual drive is
faulty and requires replacement. When the hard disk drive status light indicates a
drive fault, you can replace a hot-swap drive without turning off the server.
Note: The hard disk drive activity light is also known as the SCSI hard disk drive
activity light.
Each hot-swap drive that you plan to install must be mounted in a hot-swap-drive
tray. The drive must have a single connector attachment (SCA) connector. Hot-swap-
drive trays come with hot-swap drives.
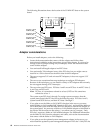
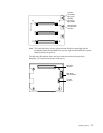
The hot-swap bays connect to a SCSI backplane. This backplane is the printed circuit
board behind the bay. The backplane controls the SCSI IDs for the hot-swap drives.
The following illustration shows the hot-swap-drive backplane component locations,
as viewed from the front of the server.
Note: The illustrations in this document might differ slightly from your hardware.