


Installing options 81
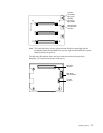
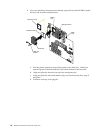
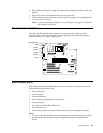
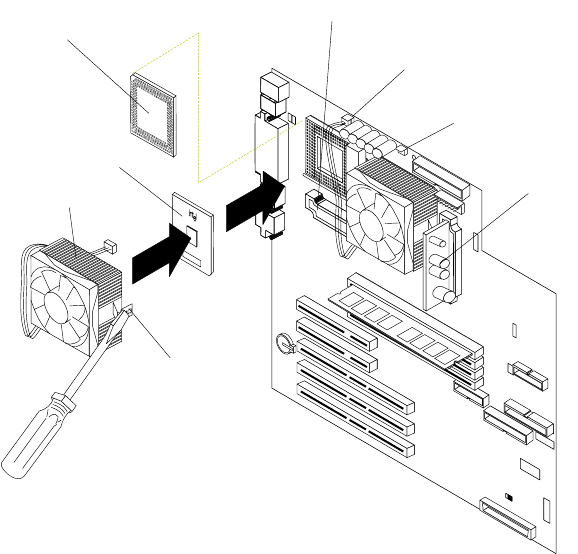
9. If you are installing a microprocessor that has a speed of 933 MHz, install a fan
sink onto the microprocessor and connect the fan-sink power cable to the system
board:
a. Peel the plastic protective strip off the bottom of the fan sink. Make sure that
the square of thermal material is still on the bottom of the fan sink.
b. Align and place the fan sink on top of the microprocessor.
c. Align and place the fan-sink retainer (clip) over the fan sink.
d. Insert a small, flat-blade screwdriver into the tab on the fan-sink retainer.
e. Press down and in with the screwdriver handle to snap the fan-sink retainer
into place in the slot on the microprocessor, over the fan sink.
f. Connect the built-in fan-sink power cable to the appropriate connector on the
system board:
• If you installed the microprocessor in connector U11, connect the fan-sink
power cable to connector J2.
• If you installed the microprocessor in connector U12, connect the fan-sink
power cable to connector J3.
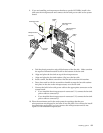
10. Place the terminator card in the static-protective package that the new
microprocessor was shipped in, and store it in a safe place. You will need to install
the terminator card again if you ever remove the microprocessor and do not
replace it with another microprocessor.
Terminator card
Microprocessor
fan 1 (J2)
Microprocessor
Microprocessor
fan 2 (J3 )
Fan sink
Fan-sink
retainer
VRM 1
(J42)
VRM 2
(J12)