


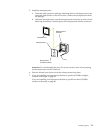
82 Hardware Maintenance Manual: xSeries 220
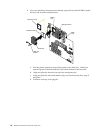
11. Install the VRM that is included in the microprocessor kit.
Attention: Use of other VRMs might cause the server to overheat.
a. Center the VRM over the appropriate VRM connector:
1) If you installed the microprocessor in connector U11, press down on the
latches on either side of connector J12, and install the VRM in connector
J12.
2) If you installed the microprocessor in connector U12, press down on the
latches on either side of connector J42, and install the VRM in connector
J42.
Note: If the server is a hot-swap model, reinstall the VRM in connector
J42 after you reinstall the support bracket assembly.
b. Make sure that the VRM is oriented and aligned correctly.
c. Press the VRM into the connector.
Note: If you remove the microprocessor later, remember to install the
terminator card in the appropriate microprocessor connector and to
remove the VRM from the appropriate VRM connector.
12. If you have other options to install or remove, do so now; otherwise, replace the
support bracket assembly; then, go to “Installing the cover” on page 83.
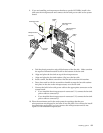
Removing a microprocessor
To remove a microprocessor, do the following:
Note: Do not use any tools when removing the microprocessor; however, you will
need a small, flat-blade screwdriver to remove the fan-sink retainer (clip).
Attention: When you handle electrostatic discharge (ESD) sensitive devices, take
precautions to avoid damage from static electricity. For details on handling these
devices, see “Handling electrostatic discharge-sensitive devices” on page 136.
1. Review the safety precautions in Statement 1 and Statement 5 in “Safety
information” on page 133.
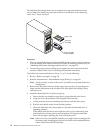
2. Turn off the server and peripheral devices, and disconnect all external cables and
power cords; then, remove the cover (see “Removing the side cover” on page 59
for details).
3. Carefully remove the support bracket assembly from the server (see “Removing
the support bracket assembly” on page 61). Store the cover and the support
bracket assembly in a safe place.
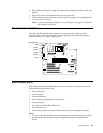
4. If the server is a hot-swap model, press down on the latches on either side of
connector J42, and remove the VRM from connector J42. (See “System board
options connectors” on page 55 for connector location.)
Note: Remember to reinstall this VRM after you reinstall the support bracket
assembly, unless you are not replacing the microprocessor.
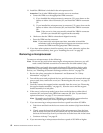
5. If you are removing a microprocessor that has a speed lower than 933 MHz:
a. Push down and back on the lever to remove the retainer (clip) from the heat
sink.
b. Firmly grasp the heat sink and lift it off the microprocessor. Store the heat
sink in a safe, clean place with the bottom side up. The thermal material on
the heat sink must stay clean if you intend to reuse the heat sink in the future.
c. Continue with step 7 on page 83.
6. If you are removing a microprocessor that has a speed of 933 MHz or higher: