


Scan to permanent e-mail destinations
17
5 Press Go/Send to start scanning.
Note: If you are using the flatbed of the scanner, watch the control panel for messages.
If prompted to Place Next Or Stop, place the next page on the flatbed and then
press Go/Send to continue scanning. Press Stop/Clear when all the pages have
been scanned.
Scan to permanent e-mail destinations
For e-mail addresses you frequently use, permanent e-mail destinations can be set up by your
network administrator. Once a permanent destination is created, it is available on the MFP control
panel.
1 Locate the MFP where the permanent destinations are stored.
2 Load all pages in the automatic document feeder of the scanner. Place the pages according
to the drawing on the scanner.
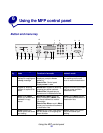
3 On the control panel, press Fax/Scan Mode repeatedly until you see SCAN → EMAIL.
4 Press Menu > repeatedly until you see your e-mail destination.
Note: If you want to send to multiple e-mail destinations, press Select when you see each
destination, and then Menu > until you see your next choice. An asterisk appears
beside your selections. Your e-mail is sent to each destination you selected and the
last destination appearing in the control panel display.
5 Press Go/Send to start scanning.
Note: If you are using the flatbed of the scanner, watch the control panel for messages.
If prompted to Place Next Or Stop, place the next page on the flatbed and then
press Go/Send to continue scanning. Press Stop/Clear when all the pages have
been scanned.