


5Maintenance and Inspection
Maintenance and inspection procedures
5-47
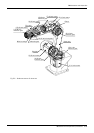
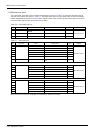
(2) Inspection, maintenance and replacement of J5-axis timing belt
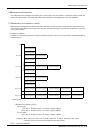
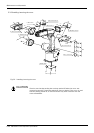
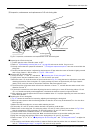
Fig.5-4 : Inspection, maintenance and replacement of J5-axis timing belt
■ Inspecting the J5 axis timing belt
1) Confirm that the robot controller power is OFF.
2) Refer to "5.3.2Installing/removing the cover" on page 44, and remove the No. 2 arm cover A.
3) Visually confirm that the symptoms indicated in "(1)Timing belt replacement period" have not occurred with the
timing belt.
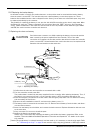
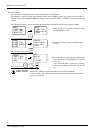
4) Confirm that the belt tension is adjusted to slacken approx. 2.3mm when the center of the belt is lightly pressed
with a finger (approx. 1.3N) as shown in
"Fig.5-5 : Belt tension".
■ Adjusting the J5 axis timing belt
1) Carry out steps "1)" and "2)" indicated in " ■ Inspecting the J5 axis timing belt" above.
2) Lightly loosen the two installation bolts <1>. (Do not loosen too much.)
3) Move the motor <3> in the directions of the arrows shown in Fig. 5-4, using the tension adjustment screw while
checking the tension of the timing belt <2>. Lightly pushing the center of the belt with your finger (approxi
-
mately 1.3 N), move the motor to the position where the belt flexes about 2.3 mm.
4) The belt tension will increase when moved in the direction of arrow "a", and will decrease when moved in the
direction of arrow "b".
5) If the belt is loosened too much when adjusting the tension causing it to come off the timing pulleys <4> and
<5>, or if the belt and pulley teeth engagement is deviated, the machine system's origin will deviate.
6) After adjusting, securely tighten the two motor installation bolts <1>. Improper tightening can cause the belt to
loosen with vibration.
■ Replacing the J5 axis timing belt
1) Fig. 5-4 shows the methods for inspecting, adjusting and replacing the timing belt.
2) Move the robot posture with the teaching pendant so that the J5 axis may be downward.(Turn it to the direc
-
tion of gravity.)
3) Make sure that the pulleys do not move while replacing the belt.
4) If the pulley <4> and <5> position relation deviates, the position could deviate.
5) Make marks on the timing belt <2> and timing pulleys <4> and <5> with a felt-tip pen as shown in Fig. 5-4 so
that the engagement of the timing belt <2> and timing pulleys <4> and <5> does not deviate.
6) Loosen the two motor installation screws <1>, and remove the belt.
7) Copy the marks onto the new timing belt. Make sure that both belts are tense when making the marks.
8) Align the new timing belt with the marks on the timing pulleys <4> and <5>, and install.
9) Refer to steps "3)" to "6)" in " ■ Adjusting the J5 axis timing belt" and "(3)Timing belt tension" to adjust the
tension.
10) The position could deviate after the belt is replaced. Confirm that the position has not deviated. If deviated,
refer to
"5.5Resetting the origin" on page 53, and reset the origin position.
M4×12(Socket bolt)
<1>Motor installation bolt
<2>Timing belt
<5>Timing pulley
<3>Motor
<4>Timing pulley
Mark