ETU400 User Guide 011603
9-10
Transferring Files Between Multiple Maces
If you are transferring files between your Mac and the host, or you are
transferring files between Maces that share the same hard drive name, you
may use the file transfer example on page 3-11. However, if you are
transferring files between Maces that have unique hard drive names, you
must use either of the examples below.
Before attempting to transfer files using multiple Maces, verify that the
following elements are identical on each involved Mac:
•
the location of InterAxcess (NLynx Technologies’ Mac emulator),
whether it's located on the hard drive or several folders deep;
•
the path through which the file is to travel.
Once you have verified that you are maintaining each of these conditions,
you are ready to transfer files using the examples below as guidelines.
Mac File Transfer Examples
In the two examples below, assume the following:
•
you are using the PCTOPC command (described on page 10-14) to transfer
a file named Test from your Mac to two other Maces;
•
Test resides in a folder named Training, which is located on the root
level of your hard drive;
•
each of the receiving Maces have unique hard drive names, and a
Training folder already exists on each of their root directories.
If InterAxcess is located at the root level of the hard drive
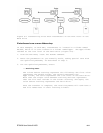
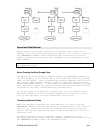
In this example, InterAxcess is on the root level of each Mac's hard
drive (Figure 9-1).
1. From the ETU menu, issue the PCTOPC command.
2. Enter the parameters as you normally would, taking special care with
the qualified pathname, as described in step 3.
3. For the qualified pathname, enter:
:Training:Test
The colon before Training represents the folder in which InterAxcess
resides. Note that there is only one colon, since InterAxcess resides at
the root level of the hard drive.
Once the transfer is complete, each of the receiving Maces will have a
new file named Test in their Training folders.


