ETU400 User Guide 011603
9-24
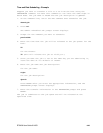
Time and Date Scheduling
The ETU Time and Date Scheduling utility allows you to submit a job to
batch and specify a time in the future that the job will be released to
the job queue. The utility can be used to schedule jobs when you know the
host system is less busy than normal, such as on weekends or at night.
All ETU power commands and any other AS/400 or user-defined command or
program that can be run in batch mode can be scheduled using the Time and
Date Scheduling feature.
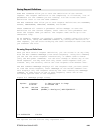
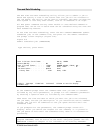
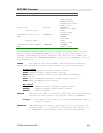
To use Time and Date Scheduling, enter the ETU command SBMSCHJOB (submit
scheduled job) on the command line, and press F4. The Submit Scheduled
Job prompt screen displays (Figure 9-4).
Figure 9-4
Submit scheduled job: (SBMSCHJOB)
Type choices, press Enter.
Command: . . . . . . . . . . . .
Hour in 24 hour clock format: . 00-24, *IMMED
Minute (00-59): . . . . . . . . 00 00-59
Date in system format: . . . . . *TODAY 000000-999999, *TODAY, 1...
Job name: . . . . . . . . . . . *JOBD Name, *JOBD
Job description: . . . . . . . . QBATCH Name
Library name: . . . . . . . . *LIBL Name, *LIBL
Bottom
F3=Exit F4=Prompt F5=Refresh F12=Cancel F13=How to use this display
F24=More keys
At the Command prompt enter the command name that you want to schedule
followed by any valid parameters, or prompt for the command's parameters
by entering a question mark (?) followed by the command name.
Then enter the time and date at which you want the job to be released,
the job name, and the job description. If you entered the entire command
string, the job will be submitted to the job queue and held until the
scheduled time.
If you prompted for the parameters, the command prompt screen will
display. After you define the request for the command, it is placed in
the job queue on hold until the scheduled time, when it is released for
processing.
NOTE: In order for the scheduling function to work, the job scheduling
program JOBSCHED, must be active on the AS/40 subsystem QINTER. See the
SBMSCHJOB command in Chapter 10 for information on starting JOBSCHED.


