


Using the BayStack 410-24T 10BASE-T Switch
2-20
309985-A Rev 00
Stack Setup
For the initial setup of a stack configuration, you need to enter the stack IP
address, the subnet mask, and the gateway address (refer to Chapter 3, “Using the
Console Interface,” for more information about configuring your BayStack
410-24T switch).
To set the stack IP address, subnet mask, and gateway address for the switch:
1.
Connect a console/terminal to one of the switches in the stack.
You can connect a console/terminal to any unit in the stack or to more than
one stack unit (see “
Console/Comm Port” on page 2-10).
2.
Power up the stack configuration.
Observe the console display screen.
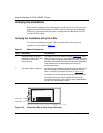
3.
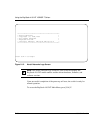
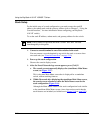
After the Nortel Networks logo screen appears, press [Ctrl]-Y:
a.
The console screen temporarily displays the (standalone) Main Menu
screen (see Figure 2-15
).
This is the same Main Menu screen that is displayed for a standalone
switch, without stacking features.
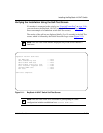
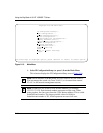
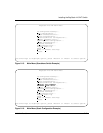
b.
Within 20 seconds after displaying the standalone Main Menu screen,
the console screen refreshes to show the Main Menu screen for the
stack configuration (Figure 2-16
).
Although the Main Menu screen for the stack configuration looks similar
to the standalone Main Menu screen, closer observation reveals that the
stack features are included (see bolded text in Figure 2-16
on page 2-21).
Note:
Unless otherwise specified, the terms “switch” and “unit” are used
interchangeably in this guide.