


C2928M-A (4/07) 21
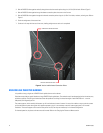
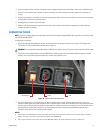
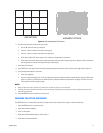
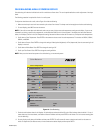
Figure 12. Grid and Alignment Test Patterns
6. To position the grid pattern to the center of the screen:
a. Use the " button to scroll up to Left Side.
b. Press the + button to adjust the left side of the image up.
c. Press the – button to adjust the left side of the image down.
d. Scroll down to Right Side. Perform steps b and c to adjust the image position up and down.
e. Scroll down to Horizontal. Perform step b (entire image moves right) and c (entire image moves left) as necessary. When the maximum
level of adjustment is reached, the image will tilt up or down slightly.
7. Scroll down to Test Pattern.
8. Press ENTER twice. The screen will be filled with the Alignment pattern that shows the last six pixels at each edge. Refer to Figure 12.
9. To size the Alignment pattern on the screen:
a. Scroll up to Image Size.
b. Press the + button (to enlarge) and – button (to reduce) the image size so that the pattern has equal amounts of pixels visible at each
edge. It is normal for a small amount of curvature (barrel or pincushion distortion) to be present at the edges. There will be no more
than one pixel of curvature along any edge.
NOTES:
•
Hiding one pixel on all sides is optimal. Try to hide at least one pixel per side, but no more than three.
• The Image Size control may affect the rotation or position of the image. Going back and forth between the Grid and Alignment procedures will
ensure the best adjustment.
10. Press the MENU button on the remote to close the menu.
CHANGING THE PICTURE AND MENUS
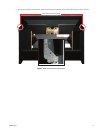
Each PMCD750 unit in an inverted wall must have the image and the menus inverted. Refer to Figure 13 and do the following:
1. Press the MENU button on the remote control.
2. Scroll down to Advanced Options.
3. Press + on the remote.
4. Scroll down to Miscellaneous Options, and then press +.
5. Scroll down to Inverted Installation.
GRID PATTERN
ALIGNMENT PATTERN