


MS860 WiFi Manual2
QUICK START
Two different methods are provided to setup the MS860 WiFi’s
TCP/IP network settings - one uses Scanner Configuration Manager
(SCM) and one uses manually scanned-in barcodes. Select only
one method. SCM is the simplest.
4.
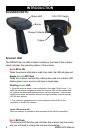
Use an unfolded paperclip to push down the battery power on/off
internal switch located inside the round hole on the yellow warning
label underneath the scanner. You will feel a ‘click’ as you push
down the switch and then hear one beep from the scanner. When
shipped from the factory, the scanner’s on/off switch is in the “off”
position, so the scanner must be switched on before operation.
2.
Install the VCOM utility from the User Guide CD to your PC’s
desktop. After installation is complete, the VCOM icon will appear
on the desktop and task bar. Double click one of the VCOM icons
and the Virtual Com utility screen will appear.
Press the “CONFIG” button. Enter an IP address and (virtual) com
port to associate with each other. Once these values are set click
OK, then press the Start (“Star”) button to begin communication.
5.
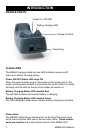
Place the MS860 scanner on the cradle - the cradle’s Charging
Status LED will now glow red while charging. After 4½ to 5 hours
the status LED color will change to green, meaning that the MS860
has been fully charged and is ready to use.
3.
Connect the plug of the power adapter into the power jack on the
cradle, and connect the power adapter into an AC outlet. You will
hear a beep, and the Power Status and Charging Status LEDs on
the top of the cradle will glow green.
1.
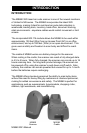
INTRODUCTION
Install Scanner Configuration Manager from the User Guide
CD. Once the installation is complete, the SCM icon will
appear on your desktop. Open SCM and click “Tools” / “WiFi-
Setup”. Follow the wizard, and after filling in all the network
configuration info that you’ve obtained from your Network
Administrator, you will be able to print out a barcode setup
sheet by clicking the SCM “Print” icon. Use your MS860 to
scan the printed barcode sheet to configure your scanner.
a.
The other method is to use your MS860 to manually scan in bar
codes found on page 68 and the ASCII Chart on pages 70 to
73. This technique is more difficult and time-consuming than
SCM, but can give the user full hands-on control over the
MS860’s IP settings. This method is not appropriate for the
purposes of this Quick Start, but the user should be aware of it
if SCM proves too limiting. The Network Setting with Bar
Codes section begins on page 16.
b.
4. Four ways were provided to setup TCP/IP network for scanner: using
barcode setting, using VCOM utility web program, using SCM and using
monitor.exe
a. Using appendix G barcode chart for scanner TCP/IP network setting,
turn on the scanner, scan “Enter into Command Mode””default””CR
($M)””EE”, network setting will go back to factory default; IP:
192.168.1.250, Mask: 255.255.255.0, Gateway: 192.168.1.254. Barcode
setup detail will be shown in the later chapter.
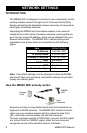
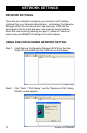
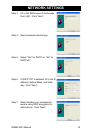
b. Using VCOM utility web program, prepare a WLAN AP:
SSID=”wlandemo”, WEP=off, IP=192.168.1.1, power on the scanner,
scanner default IP=192.168.1.250, open VCOM utility and click “Search”
button, you will see another SNMP Search screen, click “Search” button
and you will see 192.168.1.250 shown in the IP list, click on the IP
address and web configuration program will be opened, you can
configure all your needs to the scanner by this web program.
c. Using SCM program, install scanner configuration manager from user
guide CD, once the installation was finished, SCM icon will be shown on
the desktop, open the program and click “Tools””WiFi-Setup”, please
follow the wizard, after you fill in all network configuration and you will be
able to print out the barcode setup sheet, you can scan the printed
barcode sheet to finish you network configuration.
Once the scanner is connected to the WLAN, the flashing green LED on
the scanner turn into steady green.