


E-9
Cisco Aironet 802.11a/b/g Wireless LAN Client Adapters (CB21AG and PI21AG) Installation and Configuration Guide
OL-4211-03
Appendix E Configuring the Client Adapter through the Windows XP Operating System
Configuring the Client Adapter
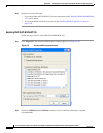
Step 12 Follow the steps below to enter a static WEP key if you are planning to use static WEP.
Note If you are planning to use EAP-TLS or PEAP authentication, which uses dynamic WEP, go to
Step 13.
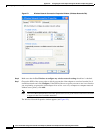
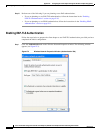
a. Make sure the The key is provided for me automatically check box is unchecked.
b. Obtain the WEP key for the access point (in an infrastructure network) or other clients (in an ad hoc
network) from your system administrator and enter it in both the Network key and Confirm network
key fields. Follow the guidelines below to enter a new static WEP key:
• WEP keys must contain the following number of characters:
–
10 hexadecimal characters or 5 ASCII text characters for 40-bit keys
Example: 5A5A313859 (hexadecimal) or ZZ18Y (ASCII)
–
26 hexadecimal characters or 13 ASCII text characters for 128-bit keys
Example: 5A583135333554595549333534 (hexadecimal) or ZX1535TYUI354 (ASCII)
Note ASCII text WEP keys are not supported on Cisco Aironet 1200 Series Access Points, so
you must enter hexadecimal characters if your client adapter will be used with these
access points.
• Your client adapter’s WEP key must match the WEP key used by the access point (in
infrastructure mode) or clients (in ad hoc mode) with which you are planning to communicate.
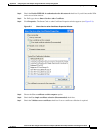
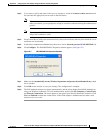
c. In the Key index (advanced) field, choose the number of the WEP key you are creating (1, 2, 3, or 4).
Note The WEP key must be assigned to the same number on both the client adapter and the access
point (in an infrastructure network) or other clients (in an ad hoc network).
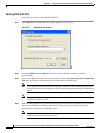
d. Click OK to save your settings and to add this SSID to the list of preferred networks (see
Figure E-1). The configuration is complete for static WEP. The client adapter automatically attempts
to associate to the network(s) in the order in which they are listed.
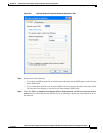
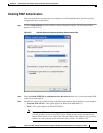
Step 13 If you enabled WPA-PSK, obtain the pre-shared key for the access point from your system administrator
and enter it in both the Network key and Confirm network key fields. Follow the guidelines below to
enter a pre-shared key:
• Pre-shared keys must contain 8 to 63 ASCII text characters or 64 hexadecimal characters.
• Your client adapter’s pre-shared key must match the pre-shared key used by the access point with
which you are planning to communicate.
Step 14 Check the The key is provided for me automatically check box if you are planning to use EAP-TLS
or PEAP, which uses dynamic WEP keys.
Note This parameter is not available if you enabled WPA or WPA-PSK.