


The Dell Fax Setup Utility dialog box opens.
6. Click the Ringing and Answering tab.
7. Click Manage Blocked Faxes.
The Manage Blocked Faxes dialog box opens.
8. Select Enable fax blocking.
9. Click OK to return to the Ringing and Answering tab.
10. Click OK.
A confirmation dialog box opens.
11. Click OK to overwrite the fax settings on your printer.
12. Click Close.
Blocking Faxes Without Caller ID
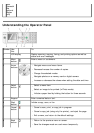
Using the Operator Panel
1. From the main menu, press the up or down Arrow button to scroll to Fax, and press the
Select
button.
2. Press the down Arrow button to scroll to Fax Setup, and press the Select button.
3. Press the down Arrow button to scroll to Fax Blocking, and press the Select button.
4. From Block No-ID, press the left or right Arrow button to choose On.
5. Press the Select
button.
If the printer detects a fax from a machine without Caller ID, the transmission is disconnected.
Using Your Computer
1. Turn on your computer and printer, and make sure they are connected.
2. Make sure your printer is properly set up to send and receive faxes. For more information, see
Setting Up the Printer With External Devices.
3.
In Windows Vista:
a. Click ® Programs.
b. Click Dell Printers.
c. Click Dell 968 AIO Printer.
In Windows XP or Windows 2000:
Click Start® Programs or All Programs® Dell Printers® Dell 968 AIO Printer.
4. Select Dell Fax Setup Utility.