


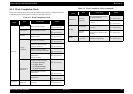
Stylus C40UX/C40SX/C20UX/C20SX Revision A
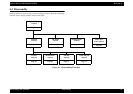
Disassembly and Assembly Disassembly 63
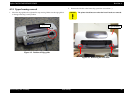
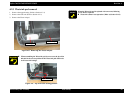
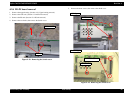
3. Remove the 2 hooks on the sides by pushing the tops of the hooks up.
Figure 4-4. Removing the side hook
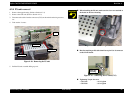
4. Remove the 3 hooks at the back using a (-) screwdriver or similar tool.
Figure 4-5. Removing the back hook
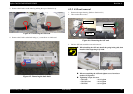
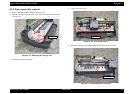
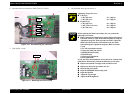
4.2.2 ASF unit removal
1. Remove the upper housing. (Refer to Section 4.2.1)
2. Take out the three screws.
Figure 4-6. Removing the ASF unit
3. Pull the ASF unit toward the rear and remove it.
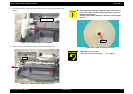
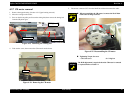
When installing the ASF unit, install the spring in the guide, then
install it while supporting it by hand.
Figure 4-7. reassembling the ASF unit
When reassembling the ASF unit tighten screws form lower
numbers in Figure4-6.
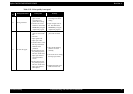
Tightening Torque for screw
- C.B.S 3x6 : 9+/-1 kgf.cm
- C.B.S (P2) 3x6 : 9+/-1 kgf.cm
- C.B.P 3x8 : 6+/-1 kgf.cm
CBP 3
×
8
CBP 3
×
6
CBS (P2) 3
×
6
3
1
2