


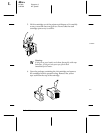

After you clean the print heads, turn off the printer; then hold
down
the
Cleaning
O button as you turn the printer back on.
(Continue holding it down for a few seconds after turning on
the printer.) This prints a demonstration page so you can see if
your print quality has improved. If the print quality is not
improved, repeat the cleaning cycle. (Be sure to always print at
least a few lines between cleaning cycles to reset the printer’s
cleaning mechanism.)
If the print quality does not improve after you clean the print
heads three times (printing a demonstration page to check after
each cleaning), and you are sure the cartridges are not low on
or out of ink (as described in the next section), contact your
dealer or authorized EPSON servicer.
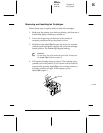
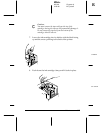
Replacing Ink Cartridges
The printer’s
Ink Out
O (black) and
Ink Out
NNN (color) lights
tell you when your ink cartridges are low on ink and when you
need to replace them. If one of these lights flashes, the
indicated cartridge is low on ink; if it remains on, you need to
replace the cartridge.
Do not replace an ink cartridge unless its
Ink Out
light tells you
to. If you replace a cartridge before its light flashes, the ink
sensor will not work with the new cartridge.
c
Caution:
❑
Leave the old cartridge installed in the printer until you
are ready to replace it with a new one. Attempting to print
without a cartridge installed can damage the printer.
❑
If you need to replace a cartridge in the middle of a print
job, you must turn off your printer and then turn it back
on. This erases the data received by the printer and you
must resend your print job.
R
Elbe+
A5 size Chapter 6
3-25-96 MT, pass 5
Maintenance
6-3