


5-104
104 | Maintaining and Transporting the Printer
•
To check job history, press until you see JOB HISTORY, then
press
Menu . For the last 10 print jobs saved in the printer, you
see the ink used (in milliliters) and paper used (in square meters).
The most recent job is saved as No. 0. When done, press the
button. Clear this setting with the
JOB HIST CLR option.
• To check the total number of prints, press until you see TOTAL
PRINTS
, then press Menu . When done, press the button.
• To check the status of other printer parts, press until you see
SERVICE LIFE, then press Menu . The status of the cutter is
displayed, using the
E*****F symbols described below. Continue
pressing to see the status of the carriage motor, paper feed motor,
print head, and cleaning unit.
The status of the ink and printer parts is indicated with these symbols:
E*****F = 100–81% ink or service life remaining
E**** F = 80–61%
E*** F = 60–41%
E** F = 40–21%
E* F = 20–11%
% = less than 10% ink or service life remaining
4. Press the
Pause button to exit the menu.
For more information about the Printer Status menu, see your electronic
Reference Guide.
Checking and Cleaning the Print Head
If your printed image shows a color shift or horizontal lines, you should
check the print head to see if any nozzles are clogged.
You can check the print head nozzles and select the Auto Cleaning feature at
the same time, using your printer utility software. This enables the printer to
print a nozzle check pattern, read it, and automatically run a cleaning cycle if
necessary.
1. Make sure paper is loaded in the paper tray.
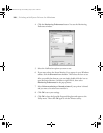
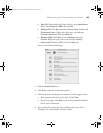
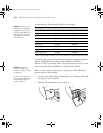
2. Do one of the following to access the printer utilities:
Note: You can run a
cleaning cycle by holding
down the Menu button
for three seconds. You
can also use the printer’s
menus to run a power
cleaning cycle. See
page 106 for details.
sp4800Guide.book Page 104 Monday, May 9, 2005 10:49 AM