


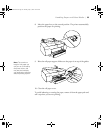

2-59
Handling Paper and Other Media | 59
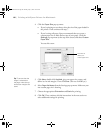
4. Use the and buttons to change the setting. (STANDARD is the
default setting; you can also choose
NARROW, WIDE, WIDER, or
WIDEST.)
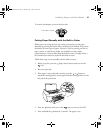
5. Press the
Menu button to save the setting. An asterisk appears next
to the selected setting.
6. Press the Pause button to exit the menu.
If you’ve selected a non-standard platen gap, the letter
N or W appears in the
corner of the display to remind you of the narrow or wide setting. When you
switch media, don’t forget to change the setting back to
STANDARD.
If you’re printing on non-Epson media, you may also need to create a paper
configuration to optimize your results. See the following section for more
information.
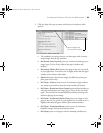
Optimizing the Settings for Your Paper
When you choose a media type in your Epson printer software, the driver
automatically determines the best settings for your paper. However, you may
want to fine-tune how the printer handles various media—especially if you
use non-Epson paper or a paper not supported by the driver. Use the paper
configuration settings described below. If you’re printing on unusually thick
or thin paper, you may also need to adjust the platen gap; if so, you should
do that first (see page 58).
You can create a special configuration, or group of settings, for each paper
type (up to ten types) and select the desired configuration whenever you
print on a particular stock.
Caution: To avoid
damaging the printer,
make sure you do not
select the Narrow
setting when you print
on heavy media.
Note: It’s a good idea to
keep a list describing your
paper configurations.
sp4800Guide.book Page 59 Monday, May 9, 2005 10:49 AM