


5-114
114 | Maintaining and Transporting the Printer
Draining the Old Ink
1. Make sure that READY appears on the LCD panel.
2. Press the
Menu button.
3. Press the button until you see
MAINTENANCE, and then press the
Menu button.
4. Press the button until you see
BK INK CHANGE, and then press the
Menu button.
5. Press the
Menu button again.
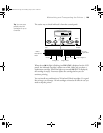
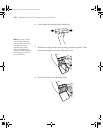
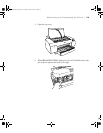
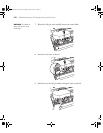
6. When
RAISE THE RIGHT INK LEVER appears on the LCD, raise the
ink lever on the right ink compartment.
7. When
RAISE THE LEFT INK LEVER appears on the LCD, raise the ink
lever on the left ink compartment.
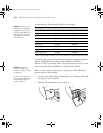
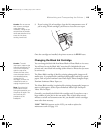
8. When
REMOVE INK CRTG appears, remove all four ink cartridges
from the left ink compartment.
9. When
INSTALL CNVRSION CRTG appears, insert the three
conversion cartridges in the slots on the left ink compartment.
10. When
LOWER THE LEFT INK LEVER appears on the LCD, lower the
ink lever on the left ink compartment.
The printer starts draining ink and
DRAINING XX% appears on the
LCD. Wait until draining is complete.
Installing the New Black Ink Cartridge
1. When draining is complete, RAISE THE LEFT INK LEVER appears on
the LCD. Raise the ink lever on the left ink compartment.
2. When
REMOVE CNVRSION CRTG appears, remove the conversion
cartridges from the slots on the left ink compartment.
3. When
INSERT INK CRTG appears, insert the cartridges in their
specified slots.
Note: If REPLACE
CNVRSION CRTG
appears, press the Pause
button. Remove the old
conversion cartridge(s)
from the left ink
compartment, and then
insert the new
conversion cartridge(s).
Go to step 4 to start
again.
sp4800Guide.book Page 114 Monday, May 9, 2005 10:49 AM