


4-9
Maintenance 4
Replacing Parts
Replacing Tubing
It is important to keep all tubing clean and free of
crimps. Tubing that has become dirty, blocked or
crimped can result in poor accuracy and precision,
or loss of air gap.
Replace both the transfer tubing and inlet tubing as
needed. See Appendix A for part numbers for
replacement tubing. For tubing installation
procedures, see Section 2.
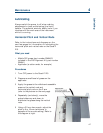
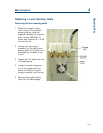
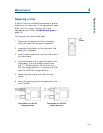
Replacing a Probe
Refer to the appropriate instructions below
depending on whether you’re replacing a probe
with one of the same type or one of a different
type.
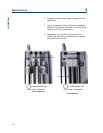
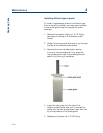
Installing same type of probe
To install a replacement probe of
the same type that’s currently
installed:
1 Remove the transfer tubing’s
1/4"-28 fitting connected to the
top of the isolation probe
holder.
2 Grasp the current probe and
push it up through the top of
the isolation probe holder.
3 Insert the probe into the top of
the isolation probe holder and
pull it through the holder and
the probe guide insert until the
tip of the probe is in the probe
guide.
4 Replace and tighten the 1/4"-28
fitting.
Replacing Parts