


1. On the client workstation, click Start-->Settings-->Printers.
2. Double-click the Add Printer icon.
3. Select the Network print server radio button.
4. Select the PSA and printer from the list box. Or, type the Universal Naming Convention (UNC) path (for
example: "\\spooler1\printer1"). See Microsoft documentation for more information about UNC. Click OK.
5. Answer subsequent questions to complete the driver installation.
For Windows XP:
1. On the client workstation, click Start and then choose My Computer. Under Other Places, click My
Network Places. Now click Search on the toolbar and type the name or IP address of the PSA.
2. Double-click the PSA that was found. This will expand into a list of printers available on the PSA.
3. Right-click on the printer and click Connect to install. The printer should now be in the printers and faxes
folder.
Or:
1. On the client workstation, click Start and then choose Printers and Faxes.
2. Under Printer Tasks select Add a printer.Double-click the Add Printer icon.
3. Select the Network print server radio button.
4. Select the Connect to this printer radio button and type the Universal Naming Convention (UNC) path (for
example: "\\spooler1\printer1"). See Microsoft documentation for more information about UNC. Click Next.
5. Answer subsequent questions to complete the driver installation.
Bypassing Point and Print
Installing printers on each client computer is required in order for clients to be able to print using the PSA. With the
Microsoft Point and Print technology, when a printer is added to a client, an associated driver is automatically
installed on the client also. This helps make printer installation easy. However, the driver associated with a given
printer can only be managed at an administrator level, so changes to that driver such as enabling duplex or
changing the driver itself will be reflected on all Windows NT, 2K, and XP clients using that printer; only one driver
can be associated with a given printer.
In order to bypass this functionality, clients can install a local printer that uses a local port to print through the PSA.
Note: This requires the client to install a driver locally. Because the installed printer is viewed by the computer as a
local printer, it will not receive job status feedback from the PSA. For example, if the printer on the PSA has been
paused, the client printer will not reflect this and it may look like a job was printed when it was not.
To install a local printer with local driver that prints through the PSA, follow the following steps.
For Windows 2000 and XP Clients:
1. Start the Add Printer wizard (in Windows 2000 or XP).
2. Click Next.
3. On the Local or Network Printer screen, select Local printer and then click Next.
Note: On this screen, make sure Automatically detect and install any Plug and Play printer is not
selected.
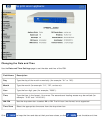
4. On the Select the Printer Port screen, select Create a new port and then select Local Port as the
Type. Click Next.
5. On the Port Name screen, type the UNC name for the printer in the following format and click OK: