


1. Start the application KeyChange.exe that is supplied on the CD shipped with the PSA.
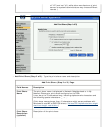
2. Create the Authentication Key:
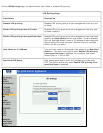
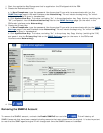
a. In New Passphrase, type the password. Use the engine ID you wish to communicate with (on the
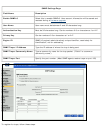
SNMP Settings page in the web interface under Networking). Do not include the beginning "0x" which
indicates the value is given in hexadecimal.
b. Click Update New Key. This value, excluding "0x", is the authentication key. Copy this key (omitting the
"0X") and paste it into the Authentication Key field on the
SNMP Settings page (on the menu in the
PSA's web interface under Networking).
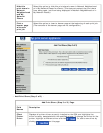
3. Create the Privacy Key:
a. In New Passphrase, type the password. Use the engine ID you wish to communicate with(on the SNMP
Settings page in the web interface under Networking). Do not include the beginning "0x" which indicates
the value is given in hexadecimal.
b. Click Update New Key. This value, excluding "0x", is the privacy key. Copy this key (omitting the "0X")
and paste it into the Privacy Key field on the
SNMP Settings page (on the menu in the PSA's web
interface under Networking).
4. Click .
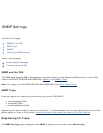
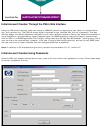
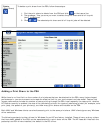
Removing the SNMPv3 Account
To remove the SNMPv3 account, uncheck the Enable SNMPv3 box and click . This will destroy all
SNMPv3 accounts that have been created including accounts that were cloned from the original. It is also important
to note that the SNMP agent's engine ID will change each time the SNMPv3 account is deleted.