


Note: The rackmount installation should be performed by an experienced individual, using appropriate tools, and
exercising appropriate safety precautions.
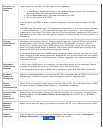
Use the following procedure to perform the rackmount installation:
1. Attach the rackmount brackets to the sides of the appliance.
2. Position the appliance in the rack.
3. Install the appliance into the rack. Use all of the provided screws in both vertical rails of the rack.
Caution: To prevent unstable mounting of the appliance, Hewlett-Packard recommends using two screws
per bracket.
4. Now the cables should be connected.
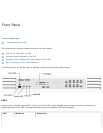
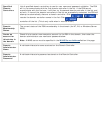
Cable Connections
Use the following steps to connect the cables:
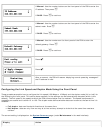
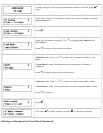
1. DB-9 Serial Port (supports all APC uninterruptible power supplies with a Simple Signaling cable (APC
part # 940-0020B))
2. RJ-45 Network Jack
3. Power Receptacle
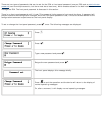
1. Connect a twisted pair network cable (not included) with an RJ-45 connector to the RJ-45 jack on the back
of the appliance (see Figure 1, number 2).
2. Connect the other end of the network cable to a network port.
3. If using an APC uninterruptible power supply (UPS), connect a Simple Signaling cable from the UPS to the
DB-9 serial port on the back of the appliance.
Note: The Simple Signaling cable is not included with the appliance or with the APC UPS. This cable can be
ordered from APC (APC part # 940-0020B).
4. Connect the power cable to the power receptacle on the back of the appliance.
Note: Make certain that air flow is not restricted around the back of the unit.
5. Connect the other end of the power cable to a power source. If a UPS is being used, connect the power
cable to the UPS.