


To clear CMOS, do the following:
1. Remove all media from the drives and turn off all attached devices and the server. Then, disconnect all
power cords from electrical outlets and disconnect all cables that are connected to the server.
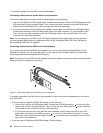
2. If the server is installed in a rack cabinet, remove the server from the rack cabinet and place it on a at,
clean, and static-protective surface. See the Rack Installation Instructions that comes with the server.
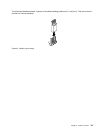
3. Remove the server cover. See “Removing the server cover” on page 69.
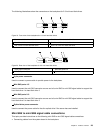
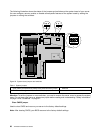
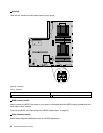
4. Locate the Clear CMOS jumper on the system board. Then, remove any parts and disconnect any
cables that might impede your access to the jumper.
5. Move the clear CMOS jumper from the default normal position (pin 1 and pin 2) to the short-circuited
position (pin 2 and pin 3).
6. Wait more than ve seconds and then move the Clear CMOS jumper back to the normal position
(pin 1 and pin 2).
7. Reinstall any parts and reconnect any cables. Then, reinstall the server cover. See “Completing the
parts replacement” on page 147.
8. Connect the server to an ac power source and wait about 30 seconds. Then, turn on the server. The
BIOS recovers to the factory default settings.
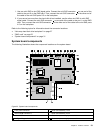
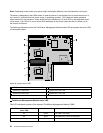
2 ThinkServer Management Module Enable/Disable jumper
When the ThinkServer Management Module Enable/Disable jumper (hereinafter referred to as the TMM
Enable/Disable jumper) is in the default normal position (pin 1 and pin 2), the server needs about 30 seconds
for the TMM to initialize whenever you connect the server to an ac power source. If you press the power
switch on the front panel during this period, the server will not start immediately; it will start after the TMM
initialization nishes. The TMM function is available in this situation.
If you move the TMM Enable/Disable jumper to pin 2 and pin 3, the TMM function is not available and the
server will be directly turned on when you press the power switch without waiting for the TMM to be ready.
Chapter 3. Product overview 37