


To clear passwords, do the following:
1. Remove all media from the drives and turn off all attached devices and the server. Then, disconnect all
power cords from electrical outlets and disconnect all cables that are connected to the server.
2. If the server is installed in a rack cabinet, remove the server from the rack cabinet and place it on a at,
clean, and static-protective surface. See the Rack Installation Instructions that comes with the server.
3. Remove the server cover. See “Removing the server cover” on page 69.
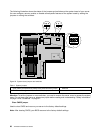
4. Locate the Clear password switch on the system board. Then, remove any parts and disconnect any
cables that might impede your access to the switch.
5. Move the clear password switch from the default off position to the on position.
6. Wait more than ve seconds and then move the clear password switch back to the off position.
7. Reinstall any parts and reconnect any cables. Then, reinstall the server cover. See “Completing the
parts replacement” on page 147
.
8. Connect the server to an ac power source and wait about 30 seconds. Then, turn on the server. The
BIOS passwords are erased, including the administrator password and user password.
9. To set new passwords, see “Using passwords” on page 49.
3 ME in force update switch
Used to update (ash) the ME.
The ME updating process usually is contained in the BIOS updating (ashing) process.
Note: Only some BIOS versions contain the parameters for updating the ME. If you want to update the ME,
ensure that your BIOS version contains the required parameters.
To update the ME, do the following:
1. Remove all media from the drives and turn off all attached devices and the server. Then, disconnect all
power cords from electrical outlets and disconnect all cables that are connected to the server.
2. If the server is installed in a rack cabinet, remove the server from the rack cabinet and place it on a at,
clean, and static-protective surface. See the Rack Installation Instructions that comes with the server.
3. Remove the server cover. See “Removing the server cover” on page 69.
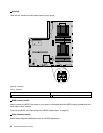
4. Locate the ME in force update switch on the system board. Then, remove any parts and disconnect any
cables that might impede your access to the switch.
5. Move the ME in force update switch from the default off position to the on position.
6. Reinstall any parts and reconnect any cables. Then, reinstall the server cover. See “Completing the
parts replacement” on page 147.
7. Connect the server to an ac power source. Then, update the BIOS. See “Updating (ashing) the BIOS”
on page 52.
8. Repeat step 1 through step 4.
9. Move the ME in force update switch back to the off position.
10. Reinstall any parts and reconnect any cables. Then, reinstall the server cover. See “Completing the
parts replacement” on page 147.
11. Connect the server to an ac power source and turn on the server. The BIOS and ME have been
updated. You need to check and congure the BIOS settings for your specic needs. See “Using
the Setup Utility program” on page 45
.
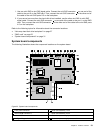
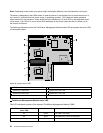
System board LEDs
This topic helps you locate the LEDs on the system board.
Chapter 3. Product overview 39