


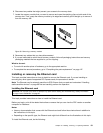


• To complete the removal procedure, go to “Completing the parts replacement” on page 147.
Installing or removing the RAID card
This topic provides instructions on how to install or remove the RAID card.
Some server models come with a required RAID card to provide advanced SATA/SAS hardware RAID
functions to the server. You also can purchase a supported RAID card from Lenovo and install it into the
server. For more information, see “RAID card” on page 25
and “Conguring RAID” on page 56.
Note: The RAID card is extremely sensitive to ESD. Ensure that you read and understand “Handling
static-sensitive devices” on page 68
rst and carefully perform the operation.
Installing the RAID card
Attention: Do not open your server or attempt any repair before reading and understanding “Safety information”
on page iii and “Guidelines” on page 67.
This topic provides instructions on how to install the RAID card.
Before you begin, print all the related instructions or ensure that you can view the PDF version on another
computer for reference.
Notes:
• Use any documentation that comes with the RAID card and follow those instructions in addition to
the instructions in this topic.
• Depending on the specic type, the RAID card and its bracket might look different from the illustrations in
this topic.
• Ensure that you back up your data before installing the RAID card because you might need to recongure
RAID and reinstall the operating system after installing the RAID card.
• If you want to install any other PCI Express card your server supports to the riser card assembly 2, refer
to the following installation procedure.
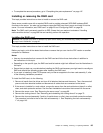
To install the RAID card, do the following:
1. Remove all media from the drives and turn off all attached devices and the server. Then, disconnect all
power cords from electrical outlets and disconnect all cables that are connected to the server.
2. If the server is installed in a rack cabinet, remove the server from the rack cabinet and place it on a at,
clean, and static-protective surface. See the Rack Installation Instructions that comes with the server.
3. Remove the server cover. See “Removing the server cover” on page 69.
4. Remove the cooling shroud. See “Removing and reinstalling the cooling shroud” on page 73.
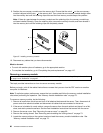
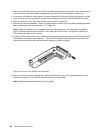
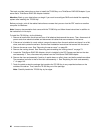
5. Remove the riser card assembly 2 and lay it upside down on a at, clean, and static-protective surface.
The procedure is similar to that of the riser card assembly 1. See “Replacing the riser card assembly
1” on page 143.
Chapter 6. Installing, removing, or replacing hardware 85