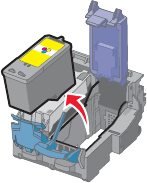
4 Remove the used print cartridge.
To recycle the used cartridge, see “Recycling Lexmark products” on page 67.
If the cartridge you removed is not empty and you want to use it later, see “Preserving the print cartridges” on
page 62.
Related topics:
• “Installing print cartridges” on page 58
Aligning the print cartridges
1 Load plain paper.
2 From the Finder desktop, double-click the Lexmark 1500 Series folder.
3 Double-click the Lexmark 1500 Series Utility icon.
4 From the Maintenance tab, click Print Alignment Page.
5 Follow the instructions on the computer screen.
If you aligned the cartridges to improve print quality, print your document again. If print quality has not improved,
clean the print cartridge nozzles.
Related topics:
• “Installing print cartridges” on page 58
• “Preserving the print cartridges” on page 62
• “Cleaning the print cartridge nozzles” on page 60
• “Wiping the print cartridge nozzles and contacts” on page 61
• “Improving print quality” on page 62
Cleaning the print cartridge nozzles
1 Load plain paper.
2 From the Finder desktop, double-click the Lexmark 1500 Series folder.
3 Double-click the Lexmark 1500 Series Utility icon.
4 From the Maintenance tab, click Clean Print Nozzles.
A page prints, forcing ink through the print cartridge nozzles to clean them.
5 To verify that the print quality has improved, print the document again.
6 If print quality has not improved, try cleaning the nozzles up to two more times.
Related topics:
• “Wiping the print cartridge nozzles and contacts” on page 61
• “Improving print quality” on page 62
Maintaining the printer
60


