


Installation and Basic Configuration
20
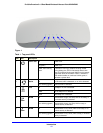
ProSafe Premium 3 x 3 Dual-Band Wireless-N Access Point WNDAP620
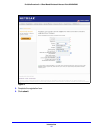
Install and Configure the Wireless Access Point
Install and configure your wireless access point in the order of the following sections:
1. Connect the Wireless Access Point to a Computer
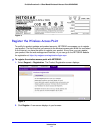
2. Log In to the Wireless Access Point
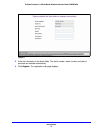
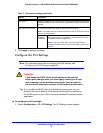
3. Configure Basic General System Settings
and Time Settings
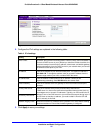
4. Configure the IPv4 Settings
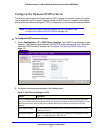
5. Configure the Optional DHCPv4 Server
6. Configure the Basic Wireless Settings
Before installing the wireless access point, make sure that your Ethernet network functions.
Af
ter you have connected the wireless access point to the Ethernet network, computers with
either 802.11b/g/n or 802.11a/n wireless adapters are able to communicate with the Ethernet
network.
For this to work correctly, verify that you have met all the system requirements, shown in
System Requirements o
n page 8.
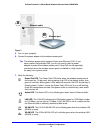
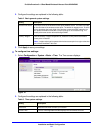
Connect the Wireless Access Point to a Computer
Tip: Before you place the wireless access point in an elevated position that is
difficult to reach, first set up and test the wireless access point to verify
wireless network connectivity.
To set up the wireless access point:
1. Unp
ack the box and verify the contents.
2. Prep
are a computer with an Ethernet adapter. If this computer is already part of your
network, record its TCP/IP configuration settings. Configure the computer with a static IP
address of 192.168.0.210 and 255.255.255.0 as the subnet mask.
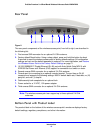
3. Connect an Ethern
et cable from the wireless access point to the computer (point A in the
following figure).
4. Securely insert
the other end of the cable into the wireless access point’s Ethernet port
(point B in the following figure).
.