


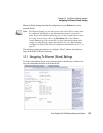


Psion Teklogix 9160 G2 Wireless Gateway User Manual 135
Chapter 12: The Ethernet (Wired) Interface
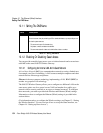
Enabling Or Disabling Guest Access
12.1.2.2 Enabling Or Disabling Guest Access
The 9160 G2 Wireless Gateway ships with the Guest Access feature disabled by
default. If you want to provide guest access on your AP, enable Guest access on the
Ethernet (Wired) Settings tab.
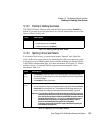
12.1.2.3 Specifying A Virtual Guest Network
If you enable Guest Access, you must create both an “Internal” and “Guest Net-
work” on this access point virtually, by connecting the LAN port on the access point
to a tagged port on a VLAN capable switch, and then defining two different Virtual
LANs on this Administration page. (For more information, see Chapter 14: “Setting
up Guest Access”.) Create the virtually separate internal and guest LANs as
described in Table 12.3.
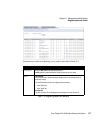
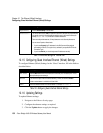
Field Description
Guest Access
By default, the 9160 G2 Wireless Gateway ships with Guest Access
disabled
.
• To enable Guest Access, click Enabled.
• To disable Guest Access, click Disabled.
Table 12.2 Enabling/Disabling Guest Access
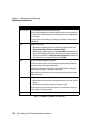
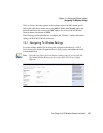
Field Description
Guest
Access
• Select Enabled to enable Guest Access. (If you choose this option, you must select VLANs on
the next setting, For Guest access use, and then provide details on VLAN for the Guest Network
on the rest of the page.)
• Select Disabled to disable Guest Access.
For Guest
Access
Specify a virtually separate guest network on this access point:
• Since the access point is using only one physical connection to your internal LAN, choose VLAN on
Ethernet Port 1 from the drop-down menu. This will enable the “VLAN” settings where you must
provide a VLAN ID. See “Configuring Guest Interface Ethernet (Wired) Settings” on page 138.
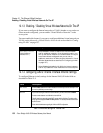
Important: If you reconfigure the Guest and Internal interfaces to use VLANs, you may lose
connectivity to the access point. First, be sure to verify that the switch and DHCP
server you are using can support VLANs per the IEEE 802.1Q standard. After con-
figuring the VLAN on the Manage > Ethernet Settings page, physically reconnect
the Ethernet cable on the switch to the tagged packet (VLAN) port. Then, re-
connect via the Administration Web pages to the new IP address.
(If necessary, check with the infrastructure support administrator regarding the
VLAN and DHCP configurations.)
Table 12.3 Specifying A Virtual Guest Network