


Page 9-25
Section 9. Optional Accessories
SATO CL608e/CL612e Service Manual
PN 9001079
Rev. B
Set Calendar (Cont)
STEP PROCEDURE
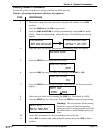
1. Year - The first display shown will have the two digit year selection
underlined. You can scroll through the dates by pressing the LINE
key. The year number will increase by one each time the LINE key is
pressed until it reaches its maximum legal value (i.e., "99" for the year
digits) at which point it will wrap around to the "00" setting.
2. Month - After you have set the correct year, pressing the FEED key
will advance the underline cursor to the two digit Month position.
You can scroll through the numbers corresponding to the month by
pressing the LINE key. The month number will increase by one each
time the LINE key is pressed until it reaches a value of "12" at which
point it will wrap around to the "01" setting.
3. Day - After you have set the correct month, pressing the FEED key
will advance the underline cursor to the two digit Day position. You
can scroll through the numbers corresponding to the month date by
pressing the LINE dey. The date number will increase by one each
time the LINE key is pressed until it reaches a value of "31" at which
point it will wrap around to the "01" setting.
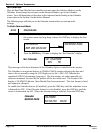
4. Hour - After you have set the correct date, pressing the FEED key will
advance the underline cursor to the two digit Hour position. You can
scroll through the numbers corresponding to the hour (using a 24
hour clock) by pressing the LINE key. The hour number will increase
by one each time the LINE key is pressed until it reaches a value of
"24" at which point it will wrap around to the "01" setting.
5. Minute - After you have set the correct hour, pressing the FEED key
will advance the underline cursor to the two digit Minute position.
You can scroll through the numbers corresponding to the hour by
pressing the LINE key. The minute number will increase by one each
time the line key is pressed until it reaches a value of "60" at which
point it will wrap around to the "01" setting.
6. After you have set the minutes, pressing the FEED key will accept the
setting. Power Off the printer to exit.