


100
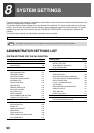
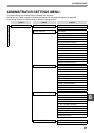
SYSTEM SETTINGS
2
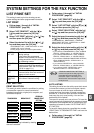
Select "LIST PRINT/SET" with the [ ] or
[ ] key and then press the [OK] key.
3
Select "LIST SETTING" with the [ ] or [ ]
key and then press the [OK] key.
4
Select "AUTO LISTING" with the [ ] or
[ ] key and then press the [OK] key.
5
Select "AUTO PRINT REPT AT LIMIT (50)"
with the [ ] or [ ] key and then press the
[OK] key.
• The setting is enabled and a checkmark appears in
the checkbox.
• If this procedure is performed when the setting is
enabled, the checkmark will be cleared and the
setting disabled.
6
If you wish to have the activity report
printed at regular intervals, go to step 7. If
you have finished selecting settings,
press the [BACK] key.
7
Select "PRINT DAILY AT DESIGNATED
TIME" with the [ ] or [ ] key and then
press the [OK] key.
8
Select "SETTING" with the [ ] or [ ] key
and then press the [OK] key.
9
Enter the printout time with the numeric
keys and press the [OK] key.
If you make a mistake, move the cursor to the incorrect
digit with the [ ] or [ ] key (the cursor should be over
the digit), and then enter the correct digit.
INITIAL SETTING
These settings are used to change the default settings
(initially set at the factory) for the various fax functions
to settings that better meet your needs.
DIAL MODE
This setting is used to set the appropriate dial mode for
the line connected to the machine. Select tone for a
tone dial line or pulse for a pulse dial line. Most lines
use tone dialling.
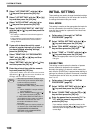
1
Follow steps 1 through 6 of "INITIAL
PROCEDURE" (page 98).
2
Select "INITIAL SETTING" with the [ ] or
[ ] key and then press the [OK] key.
3
Select "DIAL MODE" with the [ ] or [ ]
key and then press the [OK] key.
4
Select "TONE" or "PULSE" with the [ ] or
[ ] key and then press the [OK] key.
Select the appropriate mode for your telephone
line type.
PAUSE TIME
This setting is used to select the duration of pauses
that are inserted in destination fax numbers.
Normally the setting is 2 seconds, which means that
each time the [PAUSE] key is pressed when dialling or
storing a fax number, a pause of 2 seconds is inserted.
The pause time can be set to any number of seconds
from 1 to 15.
1
Follow steps 1 through 6 of "INITIAL
PROCEDURE" (page 98).
2
Select "INITIAL SETTING" with the [ ] or
[ ] key and then press the [OK] key.
3
Select "PAUSE TIME" with the [ ] or [ ]
key and then press the [OK] key.
4
Enter the pause time in seconds ("01" to
"15") with the numeric keys and then
press the [OK] key.
If you make a mistake, move the cursor to the
incorrect digit with the [ ] or [ ] key (the cursor
should be over the digit), and then enter the
correct digit.
• After step 9 you will return to step 8. If you
need to change the set time, follow steps
8 and 9 to enter the new time.
• To cancel a "PRINT DAILY AT
DESIGNATED TIME" setting, follow these
steps:
(1) Select "CANCEL" in step 8 and then
press the [OK] key.
(2) Select "CANCEL" with the [ ] or [ ]
key and then press the [OK] key.
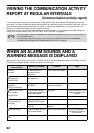
• If "AUTO PRINT REPT AT LIMIT (50)" is
not enabled and the number of recorded
transactions exceeds 50, each new
transaction will delete the oldest
transaction.
• The activity report can also be printed out
on demand. (See "PRINTING LISTS OF
PROGRAMMED INFORMATION,
SETTINGS, AND COMMUNICATION
ACTIVITY" on page 85.)
Note