


104
SYSTEM SETTINGS
3
Enter an account name (up to 18 characters
long) and press the [OK] key.
• See "ENTERING CHARACTERS" (page 86) for the
procedure for entering letters.
• If you do not wish to change the account name, press
the [OK] key.
• Press the [OK] key. You will return to the screen of
step 2. To change another number, repeat steps 2
and 3. To exit, press the [BACK] key in step 2.
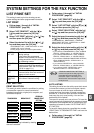
DATE & TIME SET
This setting is used to set the machine's internal clock
to the current date and time.
1
Follow steps 1 through 6 of "INITIAL
PROCEDURE" (page 98).
2
Select "INITIAL SETTING" with the [ ] or
[ ] key and then press the [OK] key.
3
Select "DATE & TIME SET" with the [ ]or
[ ] key and then press the [OK] key.
4
Enter the year (2011 to 2062), month (01 to
12), and day (01 to 31) with the numeric
keys, and then press the [OK] key.
• For the year, enter the last two digits of the year.
• The range of days that can be entered for the selected
month is displayed.
5
Enter the time in 24-hour format with the
numeric keys and press the [OK] key.
Enter a number from 00 to 23 for the hour and a number
from 00 to 59 for the minute.
AUTO SUMMER TIME SETTING
Turn on this setting to have the internal clock
automatically move forward and backward at the
beginning and end of Summer Time.
The last Sunday in May: 1:00 A.M. 2:00 A.M.*
The last Sunday in October: 1:00 A.M. 0:00 A.M.*
* Varies depending on country and region.
1
Follow steps 1 through 6 of "INITIAL
PROCEDURE" (page 98).
2
Select "INITIAL SETTING" with the [ ] or
[ ] key and then press the [OK] key.
3
Select "AUTO SUMMER TIME SETTING"
with the [ ] or [ ] key and then press the
[OK] key.
• The setting is turned on and a checkmark appears in
the checkbox.
•
If this procedure is performed when the setting is turned
on, the checkmark is cleared and the setting turned off.
DISABLE FAX PRINT HOLD
This setting is used to disable the fax print hold function,
which holds received faxes in memory instead of
printing them as they are received. (Page 29)
Normally the fax print hold function is disabled.
1
Follow steps 1 through 6 of "INITIAL
PROCEDURE" (page 98).
2
Select "INITIAL SETTING" with the [ ] or
[ ] key and press the [OK] key.
3
Select "DISABLE FAX PRINT HOLD" with
the [ ] or [ ] key and press the [OK] key.
•
The setting (which disables fax print hold) is enabled
and a checkmark appears in the checkbox.
• If this procedure is performed when the setting is
enabled, the checkmark will be cleared and the
setting disabled (fax print hold is enabled).
If you make a mistake in step 4 or 5, move
the cursor to the mistake with the [ ] or
[ ] key and then enter the correct digit.
Note