


137
Others
on the PRINTER SETUP menu changes
linked with this button setting. You can
change the number even when the printer is
printing.
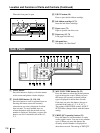
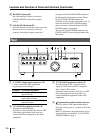
5 RIBBON REMAIN button (20, 69 )
Press this button to display the type and the
number of printouts that can still be made on
the regular screen. To not display them, press
this button again. The setting of RBN
REMAIN on the OUTPUT SETUP menu
changes linked with this button setting.
6 INPUT SELECT button (14)
Press this button to select the input signal on
the regular screen. When you press this button,
the currently selected input signal is displayed
for about three seconds. To select the input
signal, release the button while the desired
input signal is displayed. Each time you press
this button, the input signal is switched in the
order of VIDEO, RGB, S-VIDEO, RGB...
7 MEMORY FRM/FLD button (18, 33)
Press this button to select the memory mode
on the regular screen. When you press this
button, the currently selected memory mode is
displayed for about three seconds. To select
the memory mode, release the button while the
desired memory mode is displayed. Each time
you press this button, the memory mode is
switched in the order of FRAME, FIELD,
FRAME.
To make a printout of a captured image which
is blurred, set the memory mode to FIELD and
eliminate the blur by pressing this button, and
then make a printout.
8 MOTION CHECK button (46, 47)
Press this button to select the mode on the
regular screen to check whether the memory
images are blurred when you captured two- or
four-reduced images. Each time you press this
button, the type is switched in the order of
ON, OFF, ON...
The setting of MOTION CHK on the
PRINTER SETUP menu changes linked with
this button setting.
9 CAPTION INPUT button (56)
Press this button to display or clear the
CAPTION menu on the regular screen.
0 CAPTION ON/OFF button (63)
Used to determine whether a caption is printed
on the printout. To make a printout with a
caption, press this button to display ON. To
make a printout without a caption, press this
button to display OFF.
qa CLEAR button (66, 67)
Press this button to clear the images captured
in the memory pages. Which images can be
cleared with the CLEAR button depends on
the setting made with the FUNCTION SETUP
menu.
When the clear function of this button is set to
OFF, the buzzer sounds if you press the
CLEAR button.
qs EXEC button (57, 91, 97, 101, 117, 118,
119)
Press this button to execute the values set with
the COLOR ADJUST menu or to recall a user
set in the PRINTER SETUP menu and to
register the user set in the SYSTEM SETUP
menu. Also, this button is used to enter the
characters of a caption in the CAPTION
menu.
qd Cursor keys
Use to select a desired item from the menu.
Also, these keys are used to position the
cursor (green pointer ) on the regular screen
when capturing mulitple reduced images.
qf INPUT SETUP button (16, 79)
Press this button to display the INPUT SETUP
menu on the regular screen.
qg DISPLAY button (20, 68, 100)
When the regular screen is displayed, pressing
this button toggles the screen display on and
off of (messages such as, Q1, A, etc.)
regardless of the setting of the DISPLAY item
in the OUTPUT SETUP menu. The setting of
DISPLAY in the OUTPUT SETUP menu
changes linked with this button.
When the menu is displayed, pressing this
button temporarily clears the menu display.
While this button is held down, the menu
display disappears.