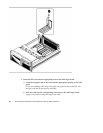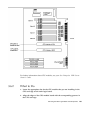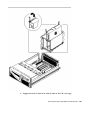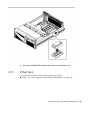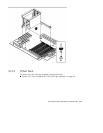
6. Simultaneously push both levers toward the center of the CPU module until
the CPU module seats in its connector.
3.6.3 What Next
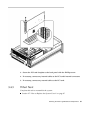
Complete this task to reassemble the system:
Section 2.7 “How to Replace the System Cover” on page 67
When you are ready to restart the system, be sure to run OpenBoot Diagnostics tests
to verify that the system functions correctly with the new parts you have just
installed. For additional information, see:
Section 7.6 “How to Use OpenBoot Diagnostics (OBDiag)” on page 195
3.7 How to Remove the NVRAM/TOD
Module
3.7.1 Before You Begin
Complete these tasks:
Section 2.1 “How to Power Off the System” on page 54
Section 2.4 “How to Position the System for Service” on page 60
Section 2.6 “How to Remove the System Cover” on page 65
Section 2.8 “How to Avoid Electrostatic Discharge” on page 69
The non-volatile random access memory/time of day (NVRAM/TOD) module
contains the system host identification (ID) and Ethernet address. You may be
migrating a functioning NVRAM/TOD module to a new main logic board in order
to preserve host ID information. However, if you are replacing a defective NVRAM/
TOD module and want to retain the same host ID, consult your authorized Sun sales
representative or service provider.
3.7.2 What to Do
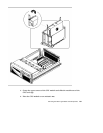
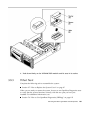
1. Locate the NVRAM/TOD module and its carrier on the main logic board.
2. Grasp the NVRAM/TOD carrier assembly at each end and pull straight up.
If necessary, gently rock the NVRAM/TOD from side to side to facilitate removal.
106
Sun Enterprise 220R Server Service Manual ♦ January 2000, Revision A


